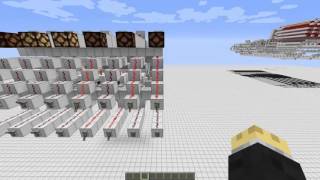
Video: 4 Bit Redstone Computer Tutorial: Making the ALU P1 by TheDarkness344
How to build it
- Place the 8 Input Lines
In a large open area, place 8 solid blocks in a row with a one-block gap between each. These represent four pairs of A and B inputs for your 4-bit binary numbers (1, 2, 4, and 8).
- Build the First Half-Adder XOR Gates
Place another block in front of each of the 8 starting blocks. For each of the four pairs, attach redstone torches to the fronts and tops of the blocks, connect them with redstone dust, and place a central block between the two output torches to form your first set of 4 XOR gates with an AND output on top for the carry.
- Extend into Full Adders
From the back of each XOR gate, build a 3-block zigzag pattern extending outward, ensuring the middle offset block juts out to the left side. Build a second XOR gate onto the end of each zigzag so that every bit now has two chained XOR gates.
- Wire the Carry Lines
Place a redstone torch on the left side of the top block of each gate to act as the carry-out. Run a stepped line of blocks with redstone dust from each bit's carry-out torch down into the second XOR gate of the next bit over, placing solid blocks over adjacent dust lines so the signals do not cross.
- Test the 4-Bit Adder
Temporarily place levers on the 8 input blocks at the front and test a few binary sums (such as 1 + 1 = 2, or 3 + 2 = 5). Remove the test levers once you confirm the outputs and carries propagate properly.
- Build the Subtractor Unit Above
Leave a 2-block vertical gap above the bottom adder so the redstone lines do not interfere, then construct an identical 4-bit full adder directly on top of the first one. This top layer will serve as your dedicated subtraction circuit.
- Link the Shared Input Bus
At the front of the machine, build redstone dust staircases that merge the 8 bottom inputs with the 8 top inputs into a single row of 8 main input lines. Place redstone repeaters at the split point so toggling one input line powers both the bottom adder and the top subtractor simultaneously.
- Invert Input A for the Subtractor
On the top subtractor layer only, locate the four 'Input A' lines (every other input line, starting with the first one). Break the piece of redstone dust right before the block and place a redstone torch underneath to invert Input A into a NOT gate.
- Invert the Subtractor Outputs
Go to the back of the top subtractor unit and extend the 4 output lines outward by one block. Place a redstone torch on the front of each of these 4 blocks to invert the final output of the subtractor.
- Build the Piston Output Selectors
Extend the 4 outputs from both the top subtractor and the bottom adder into redstone repeaters facing forward. Place downward-facing sticky pistons holding solid blocks directly in front of the repeaters, and wire the top 4 pistons and bottom 4 pistons to control levers with redstone dust so you can toggle which result (addition or subtraction) is allowed to pass through.
How it works
This 4-bit ALU operates by running addition and subtraction in parallel and using sticky pistons as simple multiplexers to choose which answer to read:
- 4-Bit Binary Adder (Bottom Layer): Each of the 4 bits uses a full adder made from two chained torch-based XOR gates. The sum comes out the back of the second XOR gate, while the carry condition is detected by the top torches and pushed left into the next bit's second XOR gate (calculating values
1,2,4, and8). - 4-Bit Subtractor (Top Layer): Instead of forcing a single adder to do both operations, an identical adder is stacked above the first. By inverting Input A with a redstone torch before it enters the circuit and inverting the Final Output with another torch at the end, the standard adder logic is converted into binary subtraction.
- Output Enable Gates: Because the shared input bus feeds both layers at the same time, both answers are calculated simultaneously. The rows of sticky pistons push or pull solid blocks in front of the output repeaters, physically connecting or breaking the wire so only the chosen operation travels to the rest of your computer.
Tips & variations
- Java vs. Bedrock Pistons: This circuit was designed in Minecraft Bedrock Edition, where redstone dust can run directly across the tops of downward-facing pistons without unintended triggering. In Java Edition, quasi-connectivity (QC) can keep pistons extended when powered from above; run your piston control line along a row of solid blocks placed directly behind the pistons instead.
- Avoid Burnout Clocks: When adding the inverting torch to Input A on the top subtractor, always break the redstone dust above the block before placing the torch underneath—otherwise the torch will power itself through the dust and burn out.
- 5th Bit Carry: The final carry-out on the 4th bit (the value 16 line) is omitted here to keep the output strictly 4-bit, though you can leave the torch attached for debugging overflow.