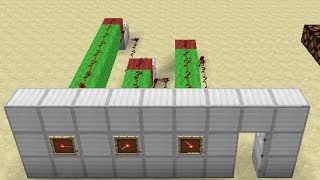
Video: Minecraft: Item Frame Combination Lock (1 Wide + Expandable) by Fed X Gaming
How to build it
- Set Up the First Dial (Odd Slice)
Clear a space that is 14 blocks long, at least 2 blocks deep, and as wide as the number of dials you want (1 to 15). Place your wall block with an item frame on the front and put an item inside (a redstone torch works great as a pointer). Behind that wall block, place a solid block with a redstone comparator facing away from the item frame.
- Build the Odd Slice Signal Line
Rotate the item in your first frame to the position you want for your code (positions 1 through 8). Place a block directly in front of the comparator, then extend a straight line of blocks going out so the total length matches your chosen number (for example, 3 blocks long for position 3). Run redstone dust along the top of these blocks.
- Install the Decoder Unit
Attach a redstone torch to the far end of the last block in your signal line; it should turn off because your item frame is currently set to the right position. Place an upside-down slab directly above that redstone torch and put a second upside-down slab out in front of the first one. Put redstone dust on the first slab and a repeater (1-tick delay) on the second slab facing away from the wall.
- Merge the Decoder Output
Place a solid block directly in front of the redstone torch, then step up one block in front of that and place a solid block directly in front of your repeater. Put redstone dust on the block in front of the torch and on the block in front of the repeater. Both pieces of dust should be completely unpowered when the dial is in the correct position.
- Set Up the Second Dial (Even Slice)
Place your second item frame right next to the first one and add a comparator behind its mounting block. To prevent adjacent redstone lines from connecting, even-numbered slices step down one block instead of going straight across out of the comparator. Place a block in front of the comparator, then continue your line of blocks one level lower for the length of your second combination number.
- Build the Even Slice Decoder
Run redstone dust down the lowered line of blocks and attach a redstone torch to the end of the final block. Just like on the first slice, place two upside-down slabs above and forward from the torch with redstone dust on the first slab and a 1-tick repeater on the second. Place the two blocks in front of the torch and repeater with dust so the upper and lower signals merge.
- Isolate Adjacent Lines (And Position 1 Adjustment)
If a longer signal line runs alongside the vertical drop of a shorter neighboring slice, place a solid block above the step-down to cut off any cross-connections. Note that if you set an even (lowered) slice to position 1, place a solid block between the two top slabs, put redstone dust on the first two blocks before the repeater, and use solid blocks on the side to keep the dust from linking to neighboring rows.
- Repeat for Additional Dials
Continue adding dials up to 15 blocks wide by repeating the upper pattern for all odd-numbered dials (1, 3, 5, etc.) and the lowered pattern for all even-numbered dials (2, 4, 6, etc.). Double-check that every slice's final output dust turns completely off when its item frame is rotated to its target position.
- Wire All Slices to the Master Output Line
At the very back of your build (14 blocks from the front wall), build a horizontal row of blocks across the width of all your dials and cover it with redstone dust. Run a line of blocks and redstone dust from the output of each individual decoder all the way to the back, placing a repeater at the end feeding into the master row (for odd slices, place a block above the end of the master line for the repeater to power). Attach a redstone torch to the side of the master line block to invert the signal and power your door.
How it works
This combination lock works by checking the exact signal strength of each item frame using a compact 1-wide signal-strength decoder:
- Item Frame Output: When an item frame holds an item, a
redstone-comparatorreading through the block outputs a signal strength between 1 and 8 depending on the item's rotation (45 degrees per click). - Exact-Number Detection: The line of
redstone-dustextends only as far as your chosen combination number (N). At block N, aredstone-torchis attached to the end. If the dial is set lower than N, the signal doesn't reach the end block, leaving the torch ON. - Over-Rotation Detection: Directly above the torch sits an upside-down slab with dust and a
redstone-repeaterat distance N + 1. If the dial is rotated past N (to N + 1 or higher), the signal is strong enough to climb onto the slab and power the repeater, turning the output ON. - NOR Gate Master Line: Only when a dial is at exact position N are both the bottom torch and top repeater OFF. Every slice feeds into the 14th-block master redstone line. If even a single dial is wrong, that slice powers the master line, which turns off the final inverting torch and locks the door.
Tips & variations
- Materials Multiplier: The material list shown above is for a single 1-wide module. Multiply those quantities by the number of item frames you plan to install (e.g., multiply by 4 for a 4-dial lock).
- Avoid Position 1 on Even Slices: Setting an even-numbered (lowered) slice to position 1 requires extra spacing and cutoff blocks behind the comparator. To keep every slice clean and identical, use positions 2–8 on even dials and save position 1 for odd dials.
- Preventing Cross-Talk: Because adjacent redstone lines alternate height by 1 block, dust can diagonally link up or down where a short slice ends next to a long slice. Always place a solid block over the step-down point to cut vertical connections between neighbors.
- Maximum Width: The back master line is a single streak of redstone dust, meaning it can span up to 15 dials without needing a repeater in the master line.